
Hi everyone! Sandy here to share today's Tuesday Card Fold project. I wanted to share something that is easy to make with just some simple scoring and folding.
But first, today's tip..... Score Tape is a must have in your craft box. It is one of the best tapes to use for bags and boxes.
Christmas was so hectic around my home this year. I thought I was already until I realized that I didn't have a little something for the kiddos' teachers (the night before the last day of school before break this weekend, oops). So I decided to make a quick sweet-treat card for them.


Hope you have a blessed day and thanks for stopping by,
But first, today's tip..... Score Tape is a must have in your craft box. It is one of the best tapes to use for bags and boxes.
Christmas was so hectic around my home this year. I thought I was already until I realized that I didn't have a little something for the kiddos' teachers (the night before the last day of school before break this weekend, oops). So I decided to make a quick sweet-treat card for them.
How to make a Sweet- Treat Candy Card

Here is what you will need:
trimmer, bone folder, ribbon, scissors, craft knife, cardstock 8 1/2x11, score tape, a finished card and candy

First you will score at 3cm, 6cm, 9cm and 12cm horizontally and then turn paper vertically and score at 3cm, flip and score other side at 3cm

Next, cut at score lines to 3cm vertical fold and then trim off to the first score line. See photo below.

In the second column, you are going to make your window.

After you make your window (I just used my trimmer), You will add the score tape to the last column and the bottom backside of the second column tab, see below.

Now go ahead and start to fold over the score lines to make your box and fold bottom tabs to close the bottom.

Now because I didn't use a piece of clear acetate, I went ahead and using my craft knife, made a slit in the middle of my card base for my ribbon to slide through.

Go head and add your candy, You can see below that 4 pieces work great.

Now add your finished card to you box base and tie your ribbon to help hold the candy in place (worked like a charm)
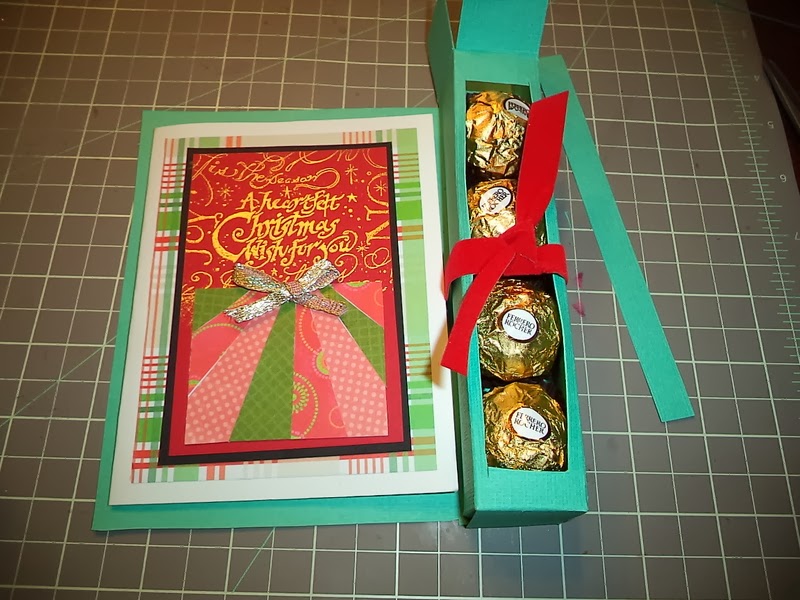
For this card, I added a small tag to embellish the sweet treat box part.

Very easy to make and is a little different from the tea light cards.

Here are my three finished cards...


I hope your enjoyed today's project. If you have a question, please leave it in the comments, and a DT member will get back to you. You can visit me to see more card/project ideas at A Working Mom's Joy. Also, you can join up to our Facebook group: Scrapbook Blessings Club for more fun, games, inspiration, tips and techniques.
And as always, comments are appreciated. Thank you for stopping by and Have a blessed day!
~ SANDY
SBC Team Designer
Hope you have a blessed day and thanks for stopping by,
Oh, so cute! Thanks for the tut on making these little boxes!!
ReplyDeleteLove this!
ReplyDeleteThese are gorgeous Sandy!
ReplyDeleteHugs
Linda xxx
what a fantastic idea mmmmm making me hungry
ReplyDeleteGorgeous Sandy hun and what a great idea x
ReplyDeleteFabulous tutorial love this idea xxx
ReplyDelete