
Saturday's Simply Homemade Linky Party featuring Guest Designer, Larissa from The Chocolate in My Life
Please welcome guest designer and linky party hostess, Larissa.
Hi, I'm Larissa and I am a SAHM/WAHM (stay at home mom/work at home mom). I have been married to the love of my life for 9 1/2 years and we have 3 beautiful children who remind me each day what life is truly about. I love to cook, sew, quilt and craft and I've recently taken up the hobby of blogging to share my hobbies with others who may like to give those things a try as well. I'll attach a couple of graphics from my blog that you are welcome to use if you'd like. Let me know if you have any questions. Thanks again so much for having me! :) Larissa The Chocolate In My Life

(Here is the wonderful tutorial she did for today's Simply Homemade Linky Party)
---------------------------------------------------------------------
I have heard a lot of people say that they want to sew, but just don't have the "talents" for it. Seriously? We all have to work for the talents we have! We all need to at least try at some point and this is the perfect pattern to do so. Your finished project looks like you have this immensely developed ability to sew, when all it takes is cutting a few squares of fabric and sewing 4 seams.
That's right, I said -4 SEAMS- !!!!
What's so hard about that?!
So, follow along with this tutorial and you'll be making up a bunch of these cute little buggers in no time!

Here's what you'll need:
1/4 yard of 2 different colors of 45" wide fabric
(you can use one color of fabric and just use 1/2 yard but I like the look of multiple colors)
1- 8" square of Thermolam (found at most fabric supply stores)
neutral colored thread
sewing machine
cutting supplies (rotary cutter, ruler, cutting mat)
Start out by cutting your fabric into 8" squares. You will need 3 squares of one color and 3 squares of another, making 6 squares total.


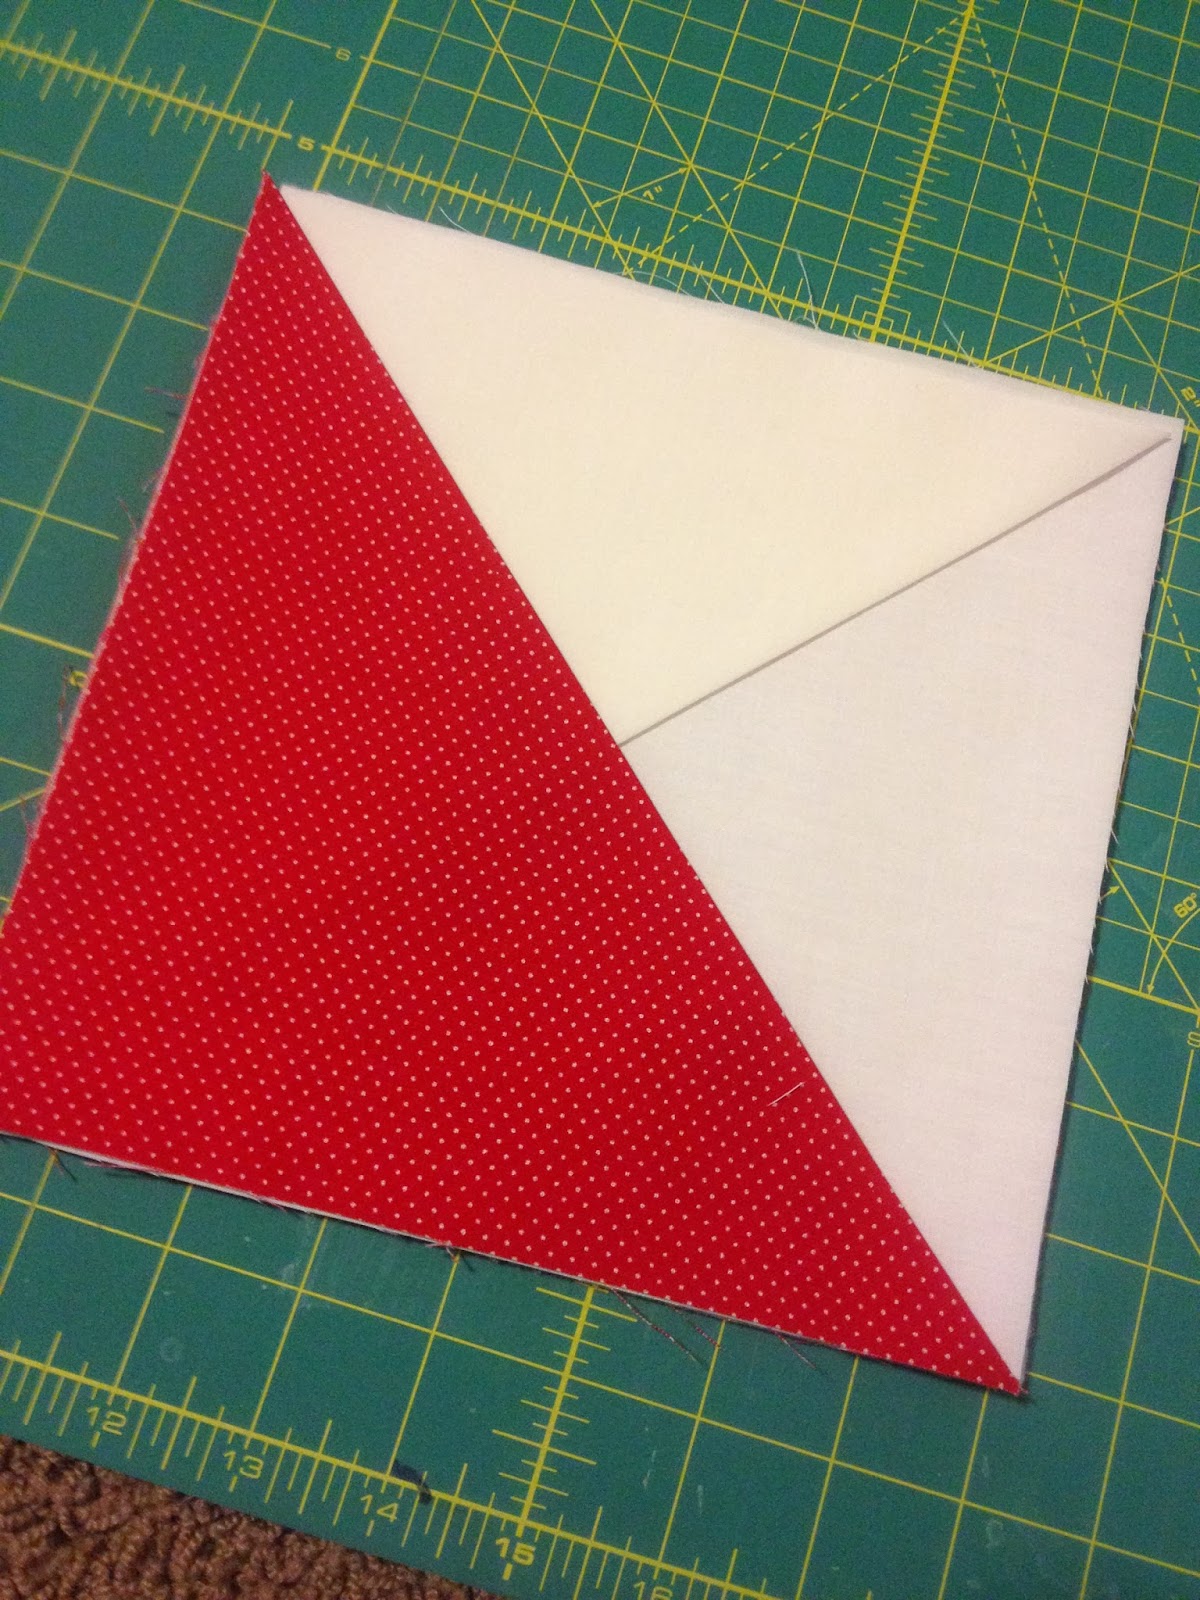
Now, take 2 squares of one fabric, and 2 of the other over to your ironing board and press them into half square triangles by folding them corner to corner (wrong sides together).

Sometimes you may have a little excess when pressing your triangles, and that's ok.

(Like this)
You can just trim it off with your rotary cutter. Just make sure it's not a really large amount or you may need to double check your squares to make sure they are cut to the correct exact measurement.
After you have all 4 triangles pressed like so...

take them back to your workspace with the remaining squares.
Take your remaining 2 squares of fabric and your 8" square of Thermolam and make a "sandwich" out of them. Pay attention to lay your first fabric wrong side up, the Thermolin in the middle and the last fabric right side up. This is where you now need to decide which fabric color you want to be the back of your hot pad.
Whichever color you'd like to be the back on your finished product needs to now lay on top (right side up).
White was my backing while making this particular pad.
White was my backing while making this particular pad.

Now comes the most difficult part.....haha.....layering your triangles.
Just keep in mind to always lay the triangles cut sides on the outer edges, and folded (pressed) edge on the inside.
Work counter-clockwise around your "sandwich".
I started by laying a white triangle on the top left corner, a red triangle on the bottom left corner and then another white triangle on the bottom right corner.
See photos below.
Now, for your last red triangle comes the difficult part.
Well, for me it was. I'm one of those that has a hard time figuring out how to fold box tops together to close them up without having to use tape. You know what I mean...the whole criss-cross method that feels like a Rubik's cube?
Ok, well maybe it's not that difficult but hopefully these photos can help it make more sense.
Lay your triangle on the top right corner (remember folded, pressed side on the inside of the square).
take the top left corner of the red triangle and fold it down.
Like so....

You will now see the first white triangle you layered.
Take the top right corner of that and fold it down as well.

You should be able to see your top layer of the "sandwich" and this point.

Now, lay the red triangle down flat, as well as the last white triangle you folded over.

You should now have something like this..

Pin around the entire edge of your square, making sure all of the corners of your triangles are laying flat.
It's okay if this part looks kind of messy and bulky, we'll take care of that in a minute.

Take your square to your sewing machine and sew a 1/4"
seam allowance all the way around your square, removing your pins as you sew. I like to back stitch at the beginning and end of each line just to give it that extra reinforcement.
After you have sewn, take it back to your cutting mat and trim off any excess so that you have clean edges. Just be careful to leave a 1/4" of fabric to the sides of your seam!

Trim the tiniest snip off of the corners to reduce bulk when turned.

And here comes the fun part. Find the center of all of your triangles and turn your hot pad right side out.

Make sure you push all of the corners out to get nice crisp corners and also, run your finger along the seams after it's turned to flatten and straighten the edges.

And it's as simple as that. Once you figure out the criss-cross of your triangles, you will be able to whip these babies out in no time!
There's even a cute little pocket for tucking your hand while using as a pot holder or to tuck in a little gift tag or message?

How cute would they be for a little gift to go with your Visiting Teaching message for the month?
Or maybe a fun little teacher gift for Valentines Day?
The thing I love most about this little project is how versatile it is. I've written this tutorial using 8" squares, but I've seen them made as large as 10" for a pot holder/trivet and as small as 5". My little girl loves to have the small ones in her play kitchen. They are the perfect size for tiny hands!
You can also do them in one color, two, or each square a different color. The possibilities are endless!
Just have fun with it. I'd love to see photos if you try them out yourself.
And as always, let me know if you have questions!

-----------------------------------------------------------
I hope your enjoyed today's project. Now it is your turn. Link up your Simply Homemade Projects. You can find all of our linky party rules up top.

If you have a questions or suggestions, please leave it in the comments. Also, you can join up to our Facebook group: Scrapbook Blessings Club for more fun, games, inspiration, tips and techniques.
Comments
Post a Comment
We love comments! Please let us know what you think.