

Hey kids! It's Cindy here on the SBC blog and I have a mini album to share with you today!
TiP: Use patterned papers from a smaller stack for mini albums/cards. The patterns are smaller scale.
I cut the pages out of cereal boxes. To cut this with your Cricut you need the deep cutting blade @6, speed at low, Pressure at max, and multi cut @2.
Elegant Edges Cricut cart - Eyelet2 @ 6" using the book feature, Scallop2 @ 6" using the book feature, Ivy @ 6" using the book feature.

Elegant Edges Cricut cart - eyelet2 @ 5 1/4". A Child's Yr Cricut cart - Boo @1" welded using Cricut Craft room (CCR).
 L-Elegant Edges Cricut cart - Scallop2 @ 5 1/4" using the oblong feature. R-Mini Books Cricut cart- cardholder @ 4 1/2". A Child's Yr-spooky @1" welded using CCR.
 L- Chic & Scary - cat @ 3 1/2". R- A Child's Yr- pumpkins @ 2", 1 1/2".
 L-Chic & Scary Cricut cart - Oct 31 @ 2".
 L-A Child's Yr- witch @ 4". R-Elegant Edges -ivy@5".
 L- Chic & Scary- tree @ 5".
 L-A Child's Yr- fright@1" welded using CCR. Elegant Edges -eyelet @ 3 1/4". R- Elegant edges- eyelet @3 1/4".
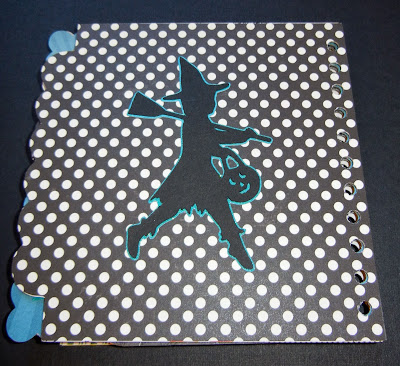 Back cover: A Child's Yr- witch @ 4". TiP: Try using glitter paper as the shadow for silhouette type cuts.
 October Afternoon-Witch Hazel postcards that I put between some of the pages.
 The Paper Studio swivel clasp. I added a pumpkin charm and some sead beads with jump rings. And then I just clipped this to the binding wire at the top of the book.
Add'l items used:
Pop dots
terrifically tacky tape to adhere and attach the cardholder
Sew Easy floss in blue lagoon and coral reef
teel glitter paper.
October Afternoon 8x8 -Witch Hazel stack
October Afternoon - Witch Hazel Miscellany pack
Cinch and 1" black wire
The Paper Studio - chevron brights ribbon
If you'd like to see more of my work please visit my blog In Love with PAPER.
Hope you have a blessed day and thanks for stopping by,
Cindy---

TiP: Use patterned papers from a smaller stack for mini albums/cards. The patterns are smaller scale.
I cut the pages out of cereal boxes. To cut this with your Cricut you need the deep cutting blade @6, speed at low, Pressure at max, and multi cut @2.
Elegant Edges Cricut cart - Eyelet2 @ 6" using the book feature, Scallop2 @ 6" using the book feature, Ivy @ 6" using the book feature.

Elegant Edges Cricut cart - eyelet2 @ 5 1/4". A Child's Yr Cricut cart - Boo @1" welded using Cricut Craft room (CCR).


Add'l items used:
Pop dots
terrifically tacky tape to adhere and attach the cardholder
Sew Easy floss in blue lagoon and coral reef
teel glitter paper.
October Afternoon 8x8 -Witch Hazel stack
October Afternoon - Witch Hazel Miscellany pack
Cinch and 1" black wire
The Paper Studio - chevron brights ribbon
If you'd like to see more of my work please visit my blog In Love with PAPER.
Hope you have a blessed day and thanks for stopping by,
Cindy---
Cindy, what a thoroughly fabulous Album, and so well set out and explained, love all the images and detail xxx
ReplyDeleteWhat a fantastic project! I need to try this. TFS! ~ Marilyn
ReplyDeleteWhat a great little mini. Love all the pages and the detail in each one. Thanks for sharing.
ReplyDeleteI love your mini album. Lots of work and detail.
ReplyDeleteI love your mini album. Lots of work and detail.
ReplyDeleteCindy this is just tooo cute! Thanks for sharing!
ReplyDeleteCindy, this is fabulous! TFS!
ReplyDelete