
Fun with Core'dinations Paper


Hey Kids!  It's Cindy for the Scrapbook Blessings Club and we're exploring Core'dinations ColorCore Cardstock today. 

TiP:  Watch for sales of 12x12 single sheets of paper at your big box stores and stock up.

Here's the explanation of ColorCore paper directly from Core'dinations website:

What Is It?
Core’dinations ColorCore Cardstock has a core color which “core’dinates” with the surface color. Each sheet has a tab underneath labeled “core color” that represents the interior color of the sheet.

You can choose to keep that color hidden or add your own creative touch by sanding, tearing or embossing.

Here are some specifics:
A sandable cardstock that has a “core’dinating” core color instead of a white core.
Heavy weight, 80 lb., premium, acid and lignin free.
Sand, tear or antique it to reveal the beautiful core colors and add your own creative touch.
Canvas texture on one side and smooth on the other

Okay, it's time to add our own creative touches :-)

Tools I've used:
embossing folder (charles)
Tim Holtz sanding tool
Tim Holtz distressing tool
chipboard letters
repositionable adhesive


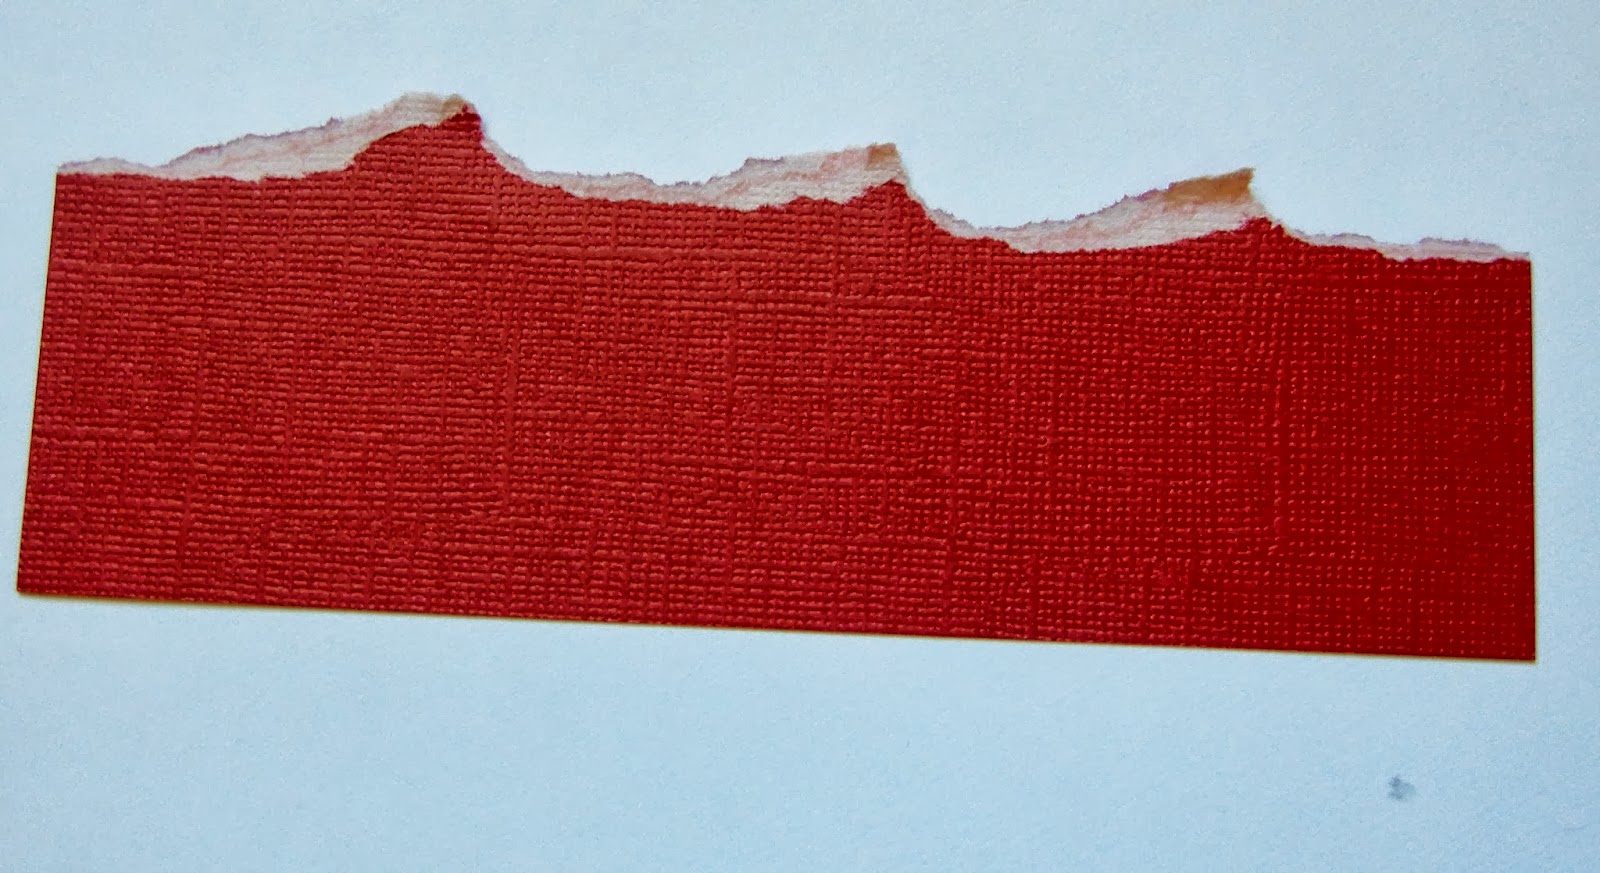
Ripping provides a really fun look.  And it's really easy...LOL!

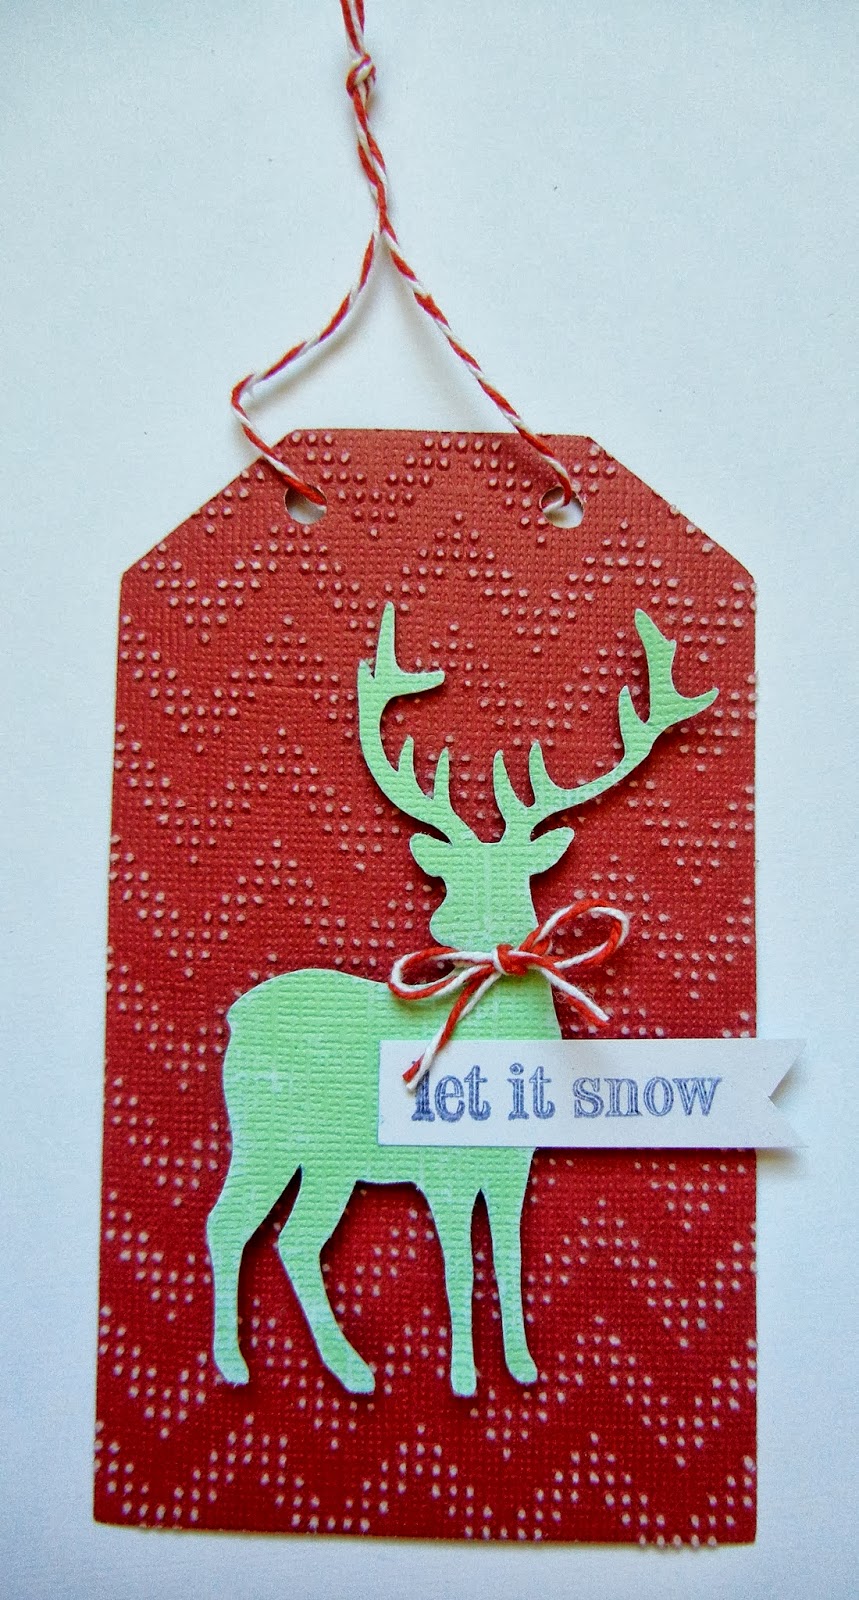
Embossing is my favorite technique to use with this paper.  You're only limited to your stash of embossing folders.

Steps:
1.)  emboss with the folder of your choice
2.)  lightly rub over your embossing with a sander

Distressed edges:            TiP:  Try using distressed edges on a card for a man or boy. 


Steps:
1.)  Lightly use the distressing tool on the edges of the cardstock
2.)  Go over it several times to get the look you want

For an antiqued look:


Steps:
1.)  Crunch your cardstock into a ball
2.)  Flatten it back out
3.)  Sand lightly with your sander

Letters:

Steps:
1.)  Stick down your chipboard letters to your craft mat with repositionable adhesive
2.)  Cover the letters with your cardstock
3.)  Lightly sand over the letters


Recipe:
Core'dinations papers
Tags, Bags, Boxes and More Cricut cart - tag @ 5"
TC Dec 25th Cricut cart - deer @ 3 1/2"
Sew Easy candy stripe floss
Impression Obsession - Fall borders stamp set
pop dots
Charles embossing folder
Tim Holtz sander

Hopefully I've inspired you to get out your core'dinations paper and play!  If you'd like to see more of my work please visit my blog In Love with PAPER.

Have a blessed day and thanks for stopping by,

Cindy---

Comments

  1. Super tag, Cindy and Coredinations is a lot of fun xxx

    ReplyDelete
  2. I'm generally not fond of this type of card stock, but seeing what you've created has made me re-think this. TFS.

    ReplyDelete
  3. Wonderful tips and ideas, Cindy! Thanks for sharing!

    ReplyDelete
  4. Cindy love your tips and ideas! I have never really liked this cardstock but love your tag with the reindeer! Will have to remember this to use on the few pieces I do have.

    ReplyDelete

Post a Comment

We love comments! Please let us know what you think.

Popular posts from this blog

My Favorite Craft Tools and Giveaway!!!

Hi everyone, Today's video is a fun one for me. Since getting back into crafting I have noticed that I am pulling certain items over and over again and thought it would be fun to share with you. Two years ago, I took a step back from crafty and downsized 75% of my craft room.  However with just these awesome tools, I have been able to get back into the swing of things and I don't miss having a larger craft room. Personally, I feel every crafter should have these starting out.  They make creating easy and fun! Tools mentioned: Misti, Neehna Bright Cardstock, Distress Oxides, Ranger Dylusions die cut, In Love Art Shop word die cuts, ATG, Prismacolor Pencils, premade cards,Fiskars cutting blade and trimmer, Zig color pens, Wink Of Stella, Alcohol markers, t-ruler, Westcott 0 ruler, 6x6 paper pads, Versamark, EK Success powder tool, 3d Crystal Lacquer, Tombow adhesive, Momento/Hero Arts black ink, Cricut, Chameleon Black Pen, Pencil, Grid stamping block, etc. For the mont

MFP Stamp Shop June Blog Hop

Welcome to the MFP Stamp Shop June Blog Hop Let's get started!!!! This month's new Stamp Set Releases are: Featured  June 23 Paper Doll Chuck Featured  June 24   Paper Doll Chuck Formal and Hunting Featured  June 25  Background Diamonds and Flowers Featured  June 26 Pots and Vases 2 Please Hop along with us!! You have a chance to win one of these new stamp sets! Just comment on the following blogs ( don't forget this one ) each day for more chances to win! ( You do NOT need to comment on on all the blogs each day! The names are drawn randomly.) The winners will be announced on June 26, 2015 right here on the MFP Stamp Shop Blog. You can go back and comment if you missed a day. ( HINT: The more you comment the more chances you have to win. And comments on the MFP blog count twice. ) The deadline for commenting is Friday June 27, 2015 at 10:00 PM EST. Okay for this card, I went a different route. I thought with the holiday coming up, why not try to make Chuck's hunting ou

Building Block Graduation Card

Hello, everyone! Melissa here on to share a "building block" style card with you. I made this one graduation themed, since there are a ton of graduations going on right now. Hope you enjoy this card, and are inspired to try it out yourself. Here is the tutorial I followed from Split Coast Stampers. To make it easier, I will give you all the measurements, here. It looks harder than it is, I promise. Start with a piece of cardstock in your desired color that is 5.5 x 10.5. Put the 10.5 inch side along the top of your score board or paper trimmer, and score at 3.5 inches and 7 inches. Fold the first score line in a mountain fold, and the second in a valley fold. You should end up with a "z" fold card. The next part can get a bit tricky, so make sure you watch the video to fully understand what I am about to explain. On the back side of the "valley" fold, take a ruler and pencil and mark these measurements: 3/8 1 3/8 1 5/8 2 5/8 2 7/8 3 7/8