
Birthday Flowers

Hey kids!  Cindy back on the SBC blog today.  I've got a fun fold birthday card to share with you.  It's the Joy fold and it's also the optional twist on our current challenge.  You can view that post and also enter the challenge here.

TiP:  Don't be afraid to try new folds.  They are fun to make and to receive :-)

 Cut your cardstock to 6 1/4 x 4 1/4".  I will refer to this one as the base.
 Cut another at 6 x 3".  I will refer to this one as the flap.
 Score the base piece @ 4 1/4". 
Score the flap @ 3". 

 Fold them both on the score lines.  (sorry about this pic)
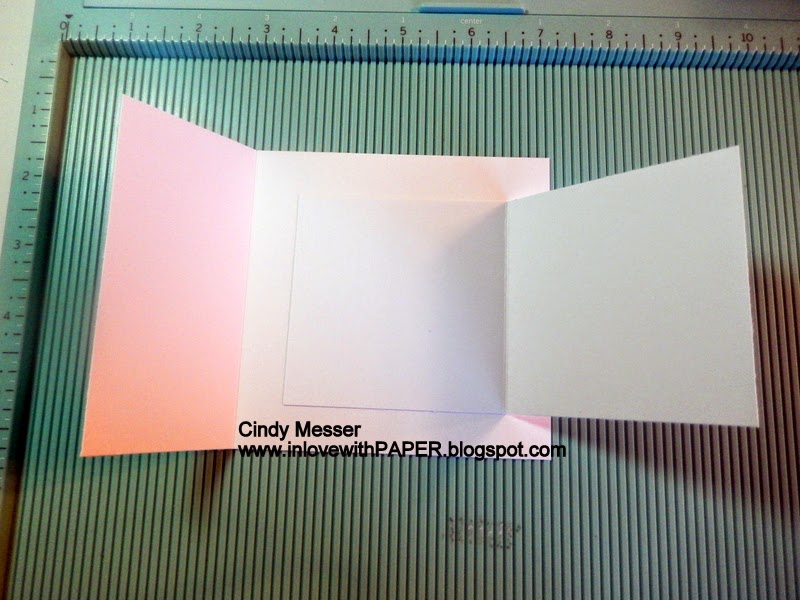
 Attach the flap in the center of the bigger side of the base as shown.
 And this is what it looks like closed.  Easy peasy, right?!!

Recipe:
Meljen's Designs digi - Lazy Susan Buggies
The Paper Studio - pink chevron paper
watercolor pencils
Glossy Accents - on ladybugs
Diamond Stickles, Stardust Stickles (wings)
TPC Studio - Greetings stamp set
pop dots
Cuttlebug embossing folder - swiss dot
pink organza ribbon

Thanks for stopping by today!  Come and play along with our current challenge (ends on 8/16).

Cindy---In Love with PAPER

Comments

Popular posts from this blog

In Love Art Shop- Show and Tell video 3

Hi everyone, I have my second video for In Love Art Shop done.  It was so much fun making these cards with easy to use stamps and wafer thin metals dies.  Here are the cards that are featured in this video along with the products I used from In Love Art Shop. Discount 15% FFSandy Please click on my affiliate link to shop: http://lddy.no/ae9w Discount: FREE SHIPPING on Orders of $25.00!!!! Product links- Floral wreaths: https://tinyurl.com/y3b8o5c6 Sentiment dies: https://tinyurl.com/y25ohd2q Word Stamps: https://tinyurl.com/yxqfee2u Cupcake: https://tinyurl.com/y3969jf8 Lace Rose oval: https://tinyurl.com/y6x8ye53 Oil painting flower stamp: https://tinyurl.com/yxvy9ybg                

Building Block Graduation Card

Hello, everyone! Melissa here on to share a "building block" style card with you. I made this one graduation themed, since there are a ton of graduations going on right now. Hope you enjoy this card, and are inspired to try it out yourself. Here is the tutorial I followed from Split Coast Stampers. To make it easier, I will give you all the measurements, here. It looks harder than it is, I promise. Start with a piece of cardstock in your desired color that is 5.5 x 10.5. Put the 10.5 inch side along the top of your score board or paper trimmer, and score at 3.5 inches and 7 inches. Fold the first score line in a mountain fold, and the second in a valley fold. You should end up with a "z" fold card. The next part can get a bit tricky, so make sure you watch the video to fully understand what I am about to explain. On the back side of the "valley" fold, take a ruler and pencil and mark these measurements: 3/8 1 3/8 1 5/8 2 5/8 2 7/8 3 7/8 ...

Oldies But Goodies Blog Hop- Day 1 (Water Coloring)

Welcome to our Oldies But Goodies Blog Hop! We'll be featuring many of our older but still fabulous stamp sets during the hop! Each day we will have a tutorial and samples for your inspiration. Follow along from April 22-24 for your chance to win the Oldie But Good  Stamp set of YOUR CHOICE. One winner will be chosen. Just leave a comment. Each day you can leave a comment on each blog to increase your chance of winning! April 22- Flowers With Watercolors April 23-Stand By Your Man Explosion Card April 24-Holidays Candy Holder Today's Tutorial is by Thrifty. You can find it here.    So last but not least (I hope, lol)! We have seen some awesome water coloring projects. For my stamped image, I am using Tim Holtz Distress Markers.  I did this tech earlier in the month for MFPS new Stamp Release Blog Hop. So here are my water color flowers, well...actually, my water color image, bunny included.  This is soooo easy to color without taking all the time for blending an...