
Perfect Spinning Pinwheels


Hi friends,
Sandy here from Scrapbook Blessings.  This is my first post at She's a Sassy Lady, and I am very excited.  This is the first blog that I followed when I got my Cricut and Gypsy wayyyy back when.  I just love all the tutorials and inspiration, and now I can something with you too!  Talk about coming full circle.  Thanks Shelia for letting me be a part of your team of wonderful crafters!

Since today is my first post AND my birthday (late 30 something, lol),  I wanted to share a fast and easy project that I do with my kiddos and for parties... A very cool SPINNING Pinwheel done for you step by step.


  • Items needed: 12x12- double sided pattern paper, scissors, paper piercer, skewers, button, 2 small plastic beads, and floral/jewelry wire


  • Measure and cute paper into 4 pieces of 6x6


  • Score corner to corner (back side of paper to show score lines better)


  • Crease and fold, making sure all score lines are going the same way (this is what helps with the spinning)


  • Cut on each score line 3/4 of the way


  • Now prep your handle by grabbing the skewer and floral wire, and cutting off about 4", wrapping one end around the stick


  •  Back to the paper, fold a corner point into the middle like below


  • Fold every other corner in to the middle to create the wheel
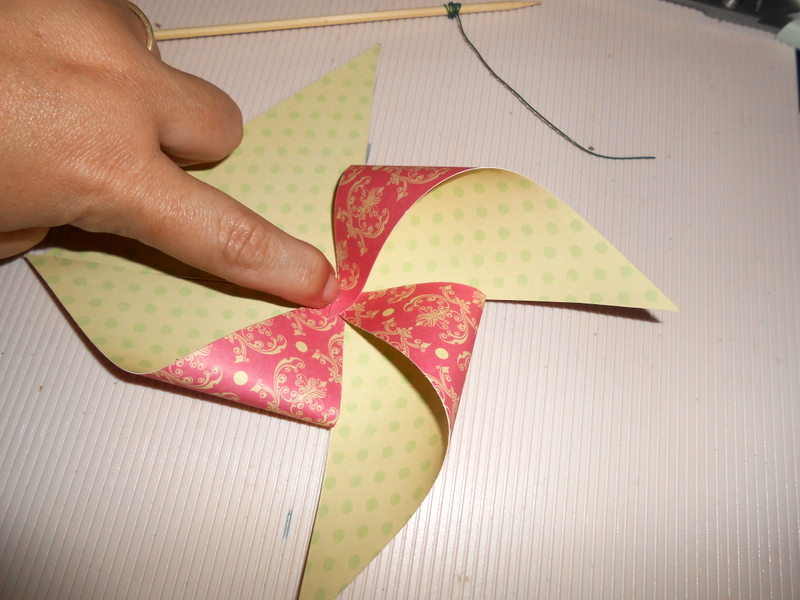
 

  • When you have every other point meeting in the middle, used your paper piercer and make a hole in the middle of the pinwheel. Keep it on the piercer to hold in place


  • Going back to the skewer, 1) place one of the pearl beads on the wire for the back


  • 2) next comes the paper 
  • 3) the other bead for the front


  • 4) the button comes on last


  • The hardest part for me is getting the wire through the other whole of the button and tight enough (I have to do this part for the kiddos too, but it can be done!). Then I wrap the wire behind the button to keep it on.


  • Almost done!  Now for the finishing touch, a little tag for the stick.  I used a scallop circle tag (a cut using the Cricut) and tied on with some ribbon.


  • My ribbon secret..... Tie it Upside Down on the skewer!  


  • You will get your tails to point down if you do!


So I hope you enjoyed this tutorial on making a Spinning Pinwheel! Perfect for the kiddos at any party!

(FYI: Cricut Craft Room has a special exclusive- 3D Pinwheels!  It is a set of 5 different pinwheels digital cuts that you can use with your machine. You can find them HERE)

Hope you have a blessed day and thanks for stopping by,
 

Comments

  1. Sandy, these are just as cute as can be... so festive for this time of year they would be perfect to use for any occasion! Thanks for sharing with us today on She's A Sassy Lady.

    ReplyDelete
  2. This is wonderful and love how you added the button to the centre. Welcome to the team and I'm a new follower:-)

    ReplyDelete

Post a Comment

We love comments! Please let us know what you think.

Popular posts from this blog

Welcome to the Create A Card Blog Hop!

  We are so happy you could join us today.  This is a one day blog hop, but don’t worry you have until Monday to stop by all the blogs and leave a comment to be entered into the drawing for the wonderful prize we have for you today. Today we are celebrating what we do... Cardmaking!  As you hop through the list of awesome crafter, I know you will be inspired to try something new! Now for our fabulous hop sponsor....drumroll please.... Catherine Pooler , founder of StampNation and Creativity Grows Here has generously donated a trial membership to StampNation for us to give away to those who hop along with us. Creativity Grows Here  http://catherinepooler.com/ classes/  StampNation  http://catherinepooler.com/ stampnation/   *************************************************** If you are just starting, you can head over at the beginning on our hostess' Theresa's blog  .   You should have arrived h...

A Year of Tech. Stamping on Pattern Paper

  Welcome to A Year of Card Techniques Blog Hop where each month we feature a different card technique.  We’ve assembled a team of card makers who range from new to advanced, so you’ll see a great variety of cards and ideas. We all love our stamp sets and we all love our patterned paper.   Well, this month we’re combining the two by stamping ON patterned paper for some unique projects.  It will be fun to see what stamps and papers our team decides to pair together.    And if you would like to check out our past technique hops, you can do that here: January-Shaving Cream Marbleizing February-So Sketchy March-no hop this month April-Stamp Set Showdown May-World of Watercolor June-Basic Card Folds July-Bleaching Your Card Our amazing sponsor this month is Card a Day Challenge Blog . Please take a moment to check out the CADC blog here . And the awesome prize this month is:     We  really apprec...

Shaker Die Giveaway

Hi everyone, Tasha here with a fun giveaway to help jump start a crafty new year! Recently, I did a tutorial showing you how to create a celebration card using a word shaker die. Now, you have an opportunity to win a "YAY" shaker die by entering this awesome giveaway! Click on the YouTube link below to enter: Prize:  Two winners will each receive one "Yay" shaker die Giveaway Rules: -Starts Friday, December 30th, 2016 and ends on Saturday, January 7th, 2017. -Must be 18+ to enter or have parent's consent -Open to: International -Must be a subscriber to the Crafty Pink Pixie YouTube channel (Click HERE to subscribe) -Must leave a comment on the giveaway YouTube video using the keyword " Shaker " (Click HERE ) -The winners will have 1 week to message me their mailing address. -For an EXTRA entry, leave a comment on this blog post letting us know one craft project you want to try in the n...