
Perfect Spinning Pinwheels


Hi friends,
Sandy here from Scrapbook Blessings.  This is my first post at She's a Sassy Lady, and I am very excited.  This is the first blog that I followed when I got my Cricut and Gypsy wayyyy back when.  I just love all the tutorials and inspiration, and now I can something with you too!  Talk about coming full circle.  Thanks Shelia for letting me be a part of your team of wonderful crafters!

Since today is my first post AND my birthday (late 30 something, lol),  I wanted to share a fast and easy project that I do with my kiddos and for parties... A very cool SPINNING Pinwheel done for you step by step.


  • Items needed: 12x12- double sided pattern paper, scissors, paper piercer, skewers, button, 2 small plastic beads, and floral/jewelry wire


  • Measure and cute paper into 4 pieces of 6x6


  • Score corner to corner (back side of paper to show score lines better)


  • Crease and fold, making sure all score lines are going the same way (this is what helps with the spinning)


  • Cut on each score line 3/4 of the way


  • Now prep your handle by grabbing the skewer and floral wire, and cutting off about 4", wrapping one end around the stick


  •  Back to the paper, fold a corner point into the middle like below


  • Fold every other corner in to the middle to create the wheel


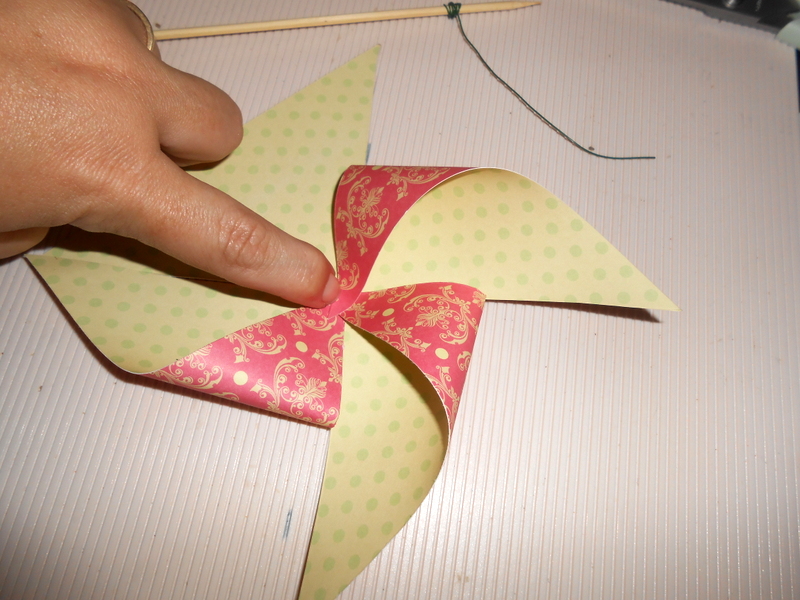
  • When you have every other point meeting in the middle, used your paper piercer and make a hole in the middle of the pinwheel. Keep it on the piercer to hold in place


  • Going back to the skewer, 1) place one of the pearl beads on the wire for the back


  • 2) next comes the paper 
  • 3) the other bead for the front


  • 4) the button comes on last


  • The hardest part for me is getting the wire through the other whole of the button and tight enough (I have to do this part for the kiddos too, but it can be done!). Then I wrap the wire behind the button to keep it on.


  • Almost done!  Now for the finishing touch, a little tag for the stick.  I used a scallop circle tag (a cut using the Cricut) and tied on with some ribbon.


  • My ribbon secret..... Tie it Upside Down on the skewer!  


  • You will get your tails to point down if you do!


So I hope you enjoyed this tutorial on making a Spinning Pinwheel! Perfect for the kiddos at any party!

(FYI: Cricut Craft Room has a special exclusive- 3D Pinwheels!  It is a set of 5 different pinwheels digital cuts that you can use with your machine. You can find them HERE)

Hope you have a blessed day and thanks for stopping by,
 

Comments

  1. Sandy, these are just as cute as can be... so festive for this time of year they would be perfect to use for any occasion! Thanks for sharing with us today on She's A Sassy Lady.

    ReplyDelete
  2. This is wonderful and love how you added the button to the centre. Welcome to the team and I'm a new follower:-)

    ReplyDelete

Post a Comment

We love comments! Please let us know what you think.

Popular posts from this blog

Building Block Graduation Card

Hello, everyone! Melissa here on to share a "building block" style card with you. I made this one graduation themed, since there are a ton of graduations going on right now. Hope you enjoy this card, and are inspired to try it out yourself. Here is the tutorial I followed from Split Coast Stampers. To make it easier, I will give you all the measurements, here. It looks harder than it is, I promise. Start with a piece of cardstock in your desired color that is 5.5 x 10.5. Put the 10.5 inch side along the top of your score board or paper trimmer, and score at 3.5 inches and 7 inches. Fold the first score line in a mountain fold, and the second in a valley fold. You should end up with a "z" fold card. The next part can get a bit tricky, so make sure you watch the video to fully understand what I am about to explain. On the back side of the "valley" fold, take a ruler and pencil and mark these measurements: 3/8 1 3/8 1 5/8 2 5/8 2 7/8 3 7/8 ...

Marks Finest Papers May Blog Hop (featuring Oriental Joy)

Welcome to the Marks Finest Papers, a Heinrich Company May Blog Hop!  This month's New Stamp Set Releases are   Featured  May 14 Oriental Joy For my Oriental Joy, I decided to use a medium that brings me joy, lol....my gold embossing powder!  So with heat embossing and a piece of 4x6 designer matte paper, I made this card. I really like how simple and neat, it turned out. Stamp set used: Oriental Joy Please stop back tomorrow to check out my next project.   Featured  May 15 Tiger Lily & Tree Frogs Featured   May 16 Bearded Iris  Please  hop along with us! You have a chance to win one of the above stamp  sets! Just comment on the following blogs (don't forget this one), each  day for more chances to win! (You do NOT have to comment on all the  blogs each day! The names are drawn randomly!) All six winners will be  announced on  May 17, 2014 on the Mark's Finest Papers blog. You can go ...

My Favorite Craft Tools and Giveaway!!!

Hi everyone, Today's video is a fun one for me. Since getting back into crafting I have noticed that I am pulling certain items over and over again and thought it would be fun to share with you. Two years ago, I took a step back from crafty and downsized 75% of my craft room.  However with just these awesome tools, I have been able to get back into the swing of things and I don't miss having a larger craft room. Personally, I feel every crafter should have these starting out.  They make creating easy and fun! Tools mentioned: Misti, Neehna Bright Cardstock, Distress Oxides, Ranger Dylusions die cut, In Love Art Shop word die cuts, ATG, Prismacolor Pencils, premade cards,Fiskars cutting blade and trimmer, Zig color pens, Wink Of Stella, Alcohol markers, t-ruler, Westcott 0 ruler, 6x6 paper pads, Versamark, EK Success powder tool, 3d Crystal Lacquer, Tombow adhesive, Momento/Hero Arts black ink, Cricut, Chameleon Black Pen, Pencil, Grid stamping block, etc. For the mon...