
“NANA’S BIRTHDAY BASH”


Welcome to “NANA’S BIRTHDAY BASH” Blog Hop! We're so happy you could join us today!  We will be showcasing projects that are Birthday related.  

If you've hopped along from Christine  then you are in the right place!!  If you are just joining me from your dashboard, or reading this via email, please be sure to CLICK HERE to start at the beginning with NANA'S BLOG. (you'll want to catch up on all the FUN!!)...

In addition to seeing a lot of awesome creations, there is some blog candy available too.  Nana a/k/a Miranda is giving away a $25 Michael’s gift card along with a surprise box.  To be eligible for the blog candy, you are required to visit each stop in the hop and leave a comment! 

So here is my project. It was a lot of fun to do and I got the inspiration from Pinterest. Just gotta love that site! Looks like a simple birthday card ( I had fun coloring the cake here with my 7 year old, I think she did a great job). I ink the edges and added some black ribbons ( this is for hubby) so I wanted it "manly"!


 But when you open it up...... There you go...40 cute. colorful candles!

 I inked the top in distressed inks to make it look like there is light from the candles... (well duh San, Like they don't know that, lol!)


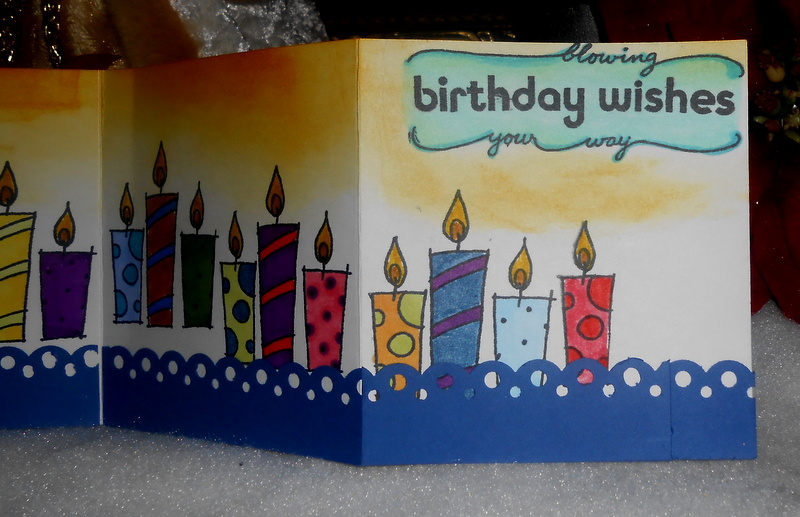
So there you go, a easy fold out card.

Next on the hop is Pam -  


Don't forget to leave a comment to be eligible for the $25 Michaels Gift Card!


SHOULD YOU GET LOST ALONG THE WAY, HERE IS THE ENTIRE LINE UP:


Hope you have a blessed day and thanks for stopping by,
 

Comments

  1. Sandy, your card is super cute! Love all the candles! LOL Thank you so much for being a part of my celebration!!!
    Miranda :)
    www.nanasscrapspot.com

    ReplyDelete
  2. Cute fold out card. Thanks for sharing

    mimicaro9650 at yahoo dot com
    http://www.whodatscrapper.blogspot.com

    ReplyDelete
  3. Sandy very, very cute card! Thanks for sharing.

    ReplyDelete
  4. Your card is so cute! It looks like a lot of work but, worth it. :) bbiswabic@new.rr.com

    ReplyDelete
  5. Wow - this is super clever and colorful - I'm certain he'll treasure this!! TFS!

    ReplyDelete
  6. Love this card! great idea!

    Angela
    www.3crazymonkeys.com

    ReplyDelete
  7. I love your card, especially the continuation of candles. Glad to be on the hop with you today.

    ReplyDelete
  8. Ohhh, how cute is that! I love all those candles! Cute idea!
    Teresa
    www.createenjoyshare.blogspot.com

    ReplyDelete
  9. Awesome!Very cute card,great idea...

    ReplyDelete
  10. what an adorable idea for a B-day card,
    cathyplus5.blogpsot.com

    ReplyDelete
  11. Oh my gosh, this card is fabulous!! Love that it opens up to all those candles! So fun!

    ReplyDelete
  12. Wow such an awesome card! I love that you used 40 candles. TFS AJ-

    ReplyDelete
  13. love your fold out card!!!

    http://cutonedesignsbyrobin.blogspot.com/

    ReplyDelete
  14. Awesome card. And I'm sure your daughter loved helping. My girls are beyond thrilled when they help.

    Melissa
    scraplady202@gmail.com

    ReplyDelete

Post a Comment

We love comments! Please let us know what you think.

Popular posts from this blog

My Favorite Craft Tools and Giveaway!!!

Hi everyone, Today's video is a fun one for me. Since getting back into crafting I have noticed that I am pulling certain items over and over again and thought it would be fun to share with you. Two years ago, I took a step back from crafty and downsized 75% of my craft room.  However with just these awesome tools, I have been able to get back into the swing of things and I don't miss having a larger craft room. Personally, I feel every crafter should have these starting out.  They make creating easy and fun! Tools mentioned: Misti, Neehna Bright Cardstock, Distress Oxides, Ranger Dylusions die cut, In Love Art Shop word die cuts, ATG, Prismacolor Pencils, premade cards,Fiskars cutting blade and trimmer, Zig color pens, Wink Of Stella, Alcohol markers, t-ruler, Westcott 0 ruler, 6x6 paper pads, Versamark, EK Success powder tool, 3d Crystal Lacquer, Tombow adhesive, Momento/Hero Arts black ink, Cricut, Chameleon Black Pen, Pencil, Grid stamping block, etc. For the mont

MFP Stamp Shop June Blog Hop

Welcome to the MFP Stamp Shop June Blog Hop Let's get started!!!! This month's new Stamp Set Releases are: Featured  June 23 Paper Doll Chuck Featured  June 24   Paper Doll Chuck Formal and Hunting Featured  June 25  Background Diamonds and Flowers Featured  June 26 Pots and Vases 2 Please Hop along with us!! You have a chance to win one of these new stamp sets! Just comment on the following blogs ( don't forget this one ) each day for more chances to win! ( You do NOT need to comment on on all the blogs each day! The names are drawn randomly.) The winners will be announced on June 26, 2015 right here on the MFP Stamp Shop Blog. You can go back and comment if you missed a day. ( HINT: The more you comment the more chances you have to win. And comments on the MFP blog count twice. ) The deadline for commenting is Friday June 27, 2015 at 10:00 PM EST. Okay for this card, I went a different route. I thought with the holiday coming up, why not try to make Chuck's hunting ou

Building Block Graduation Card

Hello, everyone! Melissa here on to share a "building block" style card with you. I made this one graduation themed, since there are a ton of graduations going on right now. Hope you enjoy this card, and are inspired to try it out yourself. Here is the tutorial I followed from Split Coast Stampers. To make it easier, I will give you all the measurements, here. It looks harder than it is, I promise. Start with a piece of cardstock in your desired color that is 5.5 x 10.5. Put the 10.5 inch side along the top of your score board or paper trimmer, and score at 3.5 inches and 7 inches. Fold the first score line in a mountain fold, and the second in a valley fold. You should end up with a "z" fold card. The next part can get a bit tricky, so make sure you watch the video to fully understand what I am about to explain. On the back side of the "valley" fold, take a ruler and pencil and mark these measurements: 3/8 1 3/8 1 5/8 2 5/8 2 7/8 3 7/8