
Welcome to MFP
AUGUST Blog Hop
Autumn Fun
AUGUST Blog Hop
Autumn Fun
There are some changes to our Blog Hop and we hope you will be pleased with them. Be sure to look over the changes before hopping along.
Blog Hop guidelines can be found HERE
Commenting and doing the tutorials will end sooner.
Blog Hop guidelines can be found HERE
Commenting and doing the tutorials will end sooner.
There will be prizes given for commenting and for doing the tutorials. Each winner will be chosen by Random.Org. Large stamp set for commenting. Mini stamp set for doing the tutorial, and everyone doing the tutorials will earn a Tutorial Badge.
Now to the HOP!
Now to the HOP!
Join us each day, Aug. 23 - 26, for some
AUTUMN FUN!
You will have until Friday, 3pm CT, Aug. 26th to comment and do the tutorials.
Tutorials
NOW...
Let's get started HOPPING !!
Hi everyone, I am excited to have some Autumn Fun... even more, I want the weather!!!!! Bring on the bonfires, sweaters, and everything pumpkin, lol.
Day Three!
Did you know there are 100 different background tutorials over at MFPSpeedy TV?!?!?! This glitter one was featured this month during the weekly blog challenges.
I didn't have double sided tape so I used a glue pen and placed the stripes and dots down randomly. A very easy way to get some sparkle.
So check out the great tutorial over at MFPSpeedy TV, especially if your stuck for ideas!
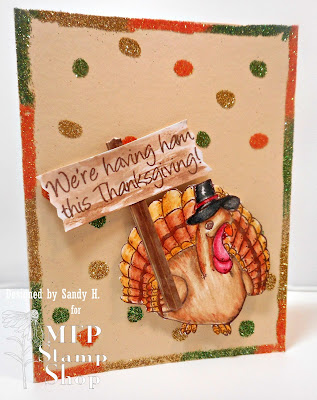

This is the stamp set I used, .
You can find it HERE .
Here's the Design Team
MFP Stamp Shop

Prizes and badge winners will be announced
on Sat. Aug. 27th.
BLOG HOP GUIDELINES AND RULES FOUND HERE! (Be sure to read)
Prize for Commenting is "BIG TREES"

BLOG HOP GUIDELINES AND RULES FOUND HERE! (Be sure to read)
Prize for Commenting is "BIG TREES"
Prize for doing one of the tutorials is the mini stamp set "From The Woods " 
MFP Tutorial Badge awarded just for trying one of the tutorials.

Enjoy the Hop. Come back each day to be inspired! Get to work on the tutorials and show us what you make by Aug. 26, 3pm CT and don't forget to be commenting! Come back on Aug. 27th to see if you are a winner!!
We hope your enjoyed today's project. If you have a questions or suggestions, please leave it in the comments. Also, we invite you to join our Facebook groups: Scrapbook Blessings Club for more fun, games, inspiration, tips and techniques and YouTube Crafters.
YouTube Crafters- https://www.facebook.com/groups/1608405749430235/
FB- SBC group- https://www.facebook.com/groups/TheScrapBookblessingsClub/
Thank you for stopping by and have a blessed day!
YouTube Crafters- https://www.facebook.com/groups/1608405749430235/
FB- SBC group- https://www.facebook.com/groups/TheScrapBookblessingsClub/
Thank you for stopping by and have a blessed day!
The way you popped up your turkey image is great. Guess I should start thinking about what we will do for the Thanksgiving Holiday this year, huh?
ReplyDeleteA super cute card.
ReplyDeleteGreat glitter background. I love the way you colored the turkey. It really added dimension to his tail feathers.
ReplyDeleteadorable
ReplyDeleteThat's a cool glittery background! Way to make do with what you have!
ReplyDeleteLove that chubby turkey! Another set to put on the wish list. TFS!
ReplyDeleteThis card put a smile on my face - super!
ReplyDeleteYour turkey is great and the sentiment is ideal! Nice colors too! hugs
ReplyDeleteWhat a fun card!!! And I love all the sparkle :) Hugs...Janie
ReplyDeleteGreat card! Looks fun to make!
ReplyDelete