
A Washi Card

Hi Friends! I am joining up with She's A Sassy Lady today to bring you a new-to-me card technique...Washi Tape.  I used it once on a card challenge and that was only using two strips, lol.  This time I decided I wanted to try the criss cross patch work design using Washi Tape.

So here it goes....
  • First, I placed the tape over the front of my first layer, criss crossing. I didn't do the bottom because I was going to cover it with a pattern paper.


  •  Next, trim the base layer by cutting off all the extra tape.  Below are my card base and layers. I did add black when I put the card together. Black is my new "pop" of color.


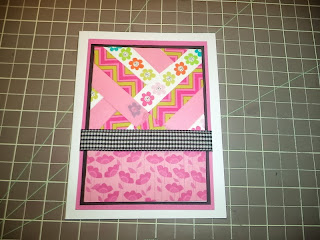
  •  Here is the card with the mats and base adhered together


  •  Quick Tip: when I am using my markers, I will stamp two images. One is to "test" the colors to see what will match with my papers and in this case, to see which circle punch would fit this image. The second is the image I will put in on my project.


  •  Finally, I attach my sentiment using popdots/tape.


  • And that's it... my first attempt at Washi!  Now, I am looking forward to my next one!

Hope you have a blessed day and thanks for stopping by,
SANDY
 

Comments

  1. Always looking for different ways to use all that Washi! Love your idea. It's simple AND looks fantastic!
    Evelyn

    ReplyDelete
  2. This is just adorable. Love the technique and the colors are wonderful. Thanks for sharing with us today at She's A Sassy Lady!

    ReplyDelete

Post a Comment

We love comments! Please let us know what you think.

Popular posts from this blog

My Favorite Craft Tools and Giveaway!!!

Hi everyone, Today's video is a fun one for me. Since getting back into crafting I have noticed that I am pulling certain items over and over again and thought it would be fun to share with you. Two years ago, I took a step back from crafty and downsized 75% of my craft room.  However with just these awesome tools, I have been able to get back into the swing of things and I don't miss having a larger craft room. Personally, I feel every crafter should have these starting out.  They make creating easy and fun! Tools mentioned: Misti, Neehna Bright Cardstock, Distress Oxides, Ranger Dylusions die cut, In Love Art Shop word die cuts, ATG, Prismacolor Pencils, premade cards,Fiskars cutting blade and trimmer, Zig color pens, Wink Of Stella, Alcohol markers, t-ruler, Westcott 0 ruler, 6x6 paper pads, Versamark, EK Success powder tool, 3d Crystal Lacquer, Tombow adhesive, Momento/Hero Arts black ink, Cricut, Chameleon Black Pen, Pencil, Grid stamping block, etc. For the mont

Building Block Graduation Card

Hello, everyone! Melissa here on to share a "building block" style card with you. I made this one graduation themed, since there are a ton of graduations going on right now. Hope you enjoy this card, and are inspired to try it out yourself. Here is the tutorial I followed from Split Coast Stampers. To make it easier, I will give you all the measurements, here. It looks harder than it is, I promise. Start with a piece of cardstock in your desired color that is 5.5 x 10.5. Put the 10.5 inch side along the top of your score board or paper trimmer, and score at 3.5 inches and 7 inches. Fold the first score line in a mountain fold, and the second in a valley fold. You should end up with a "z" fold card. The next part can get a bit tricky, so make sure you watch the video to fully understand what I am about to explain. On the back side of the "valley" fold, take a ruler and pencil and mark these measurements: 3/8 1 3/8 1 5/8 2 5/8 2 7/8 3 7/8

Independence Day Blog Tour

HAPPY 234th BIRTHDAY AMERICA!!!! To celebrate, I am participating in Operation Write Home BLOG TOUR.  Just click  HERE if you want to go on the tour with me! Of course the theme is... RED, WHITE and BLUE BIRTHDAY!   Here are my cards... If you would love to have these cute digi stamps, just head to OWH Stars and Stripes . They are all on here for free! I'll be doing a random drawing for some Birthday prizes. I haven't decided how many yet so all you have to do is leave a comment here.  If you are or become a follower, leave a second comment for another chance to win! For these cards, I used... Red/ white card stock and blue pp Silver Stickles Copics: red (R29),blue (B05), brown (E08)  For accent colors, I used my color pencils Scrappy Cat-  firework acrylic stamps and of course DIGI STAMPS!!! (my new found love, lol)