
Paper Piecing Tutorial


Hi friends, Sandy here.
 Today, I am going to show you a couple tips for paper piecing your digi stamps using The Stamping Chef digi stamps that you can find at the store HERE

First, you need to choose your image.
  • it helps if it doesn't have a lot of detail or very small details
  • make sure it is one that you can easily cut
  • don't use an image that is smaller than 2" (you can do smaller, but this will help with the frustration and finger cramping when cutting, lol)
(I like to print a lot on one page because I tend to cut them out)

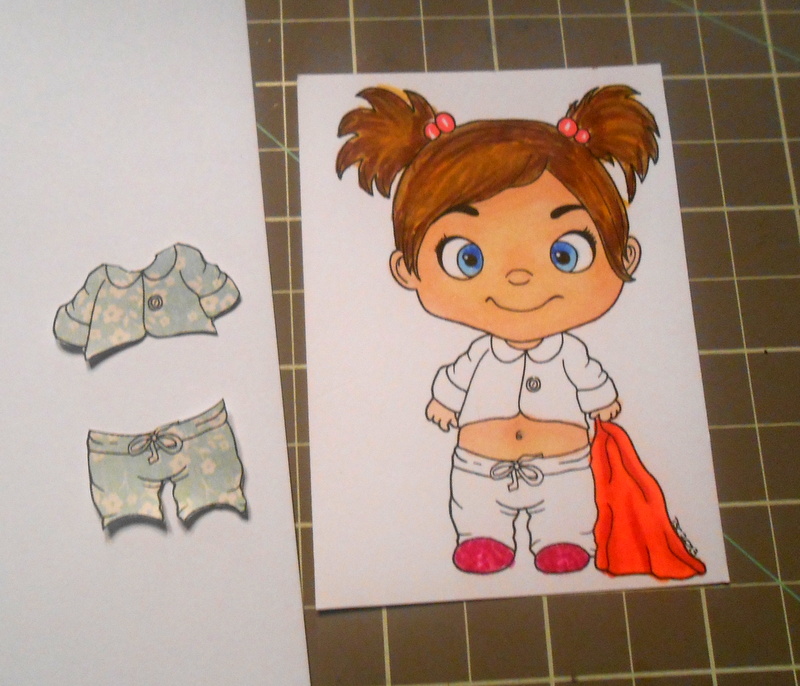
Second, you will print out the image that you will color and another with the design paper
  • make sure they are the same size
  • try to use papers that have smaller designs
  • polka dots, tiny flowers, glitter paper all work great
  • if your digi has a lot of line detail (think clothing folds and ruffles) you want a lighter color pattern paper so they show through

Third, you will color you plain base image like normal
  • you may want to think about having your design paper compliment you marker/pencil color choices

Fourth, you will cut out your design paper pieces and adhere them to base image 
  • glue pen is the best for this project or running through the Xyron tape runner


Lastly, you may want to add some shadowing to your design paper to give it some dimension.
  • for glitter paper, I used a darker Stickles color
  • markers work better to give you depth than pencils do especially if the paper had a lot of design to it.
Here is the final card...

On a side note, you can paper piece very small or very large plain images by hand.  Here are a couple examples of where I just free cut the design paper to make it fit the image.  (This reminds me more of grade school with cutting and pasting, lol). 

Pants- using a small flower- glitter design paper

Tights- using polka dot design paper

Skateboard- using a strip star design paper (just made sure to cut out one star)

Bottom of Gown and Beret- using glitter paper and added blue Stickles to give it some shading

I had a lot of fun with this tutorial and would love to see your creations!  You can check out The Stamping Chef Recipe group page on Facebook.  If you do a paper piecing, please mention it when you post your wonderful projects!


Hope you have a blessed day and thanks for stopping by,
 

Comments

  1. Great tutorial... I'm going to try to use this technique in one of my projects for The Stamping Chef...

    Carolyn
    Stamping Chef DT

    ReplyDelete
  2. Great lesson, Sandy! Paper piecing is so much fun and can add greatly to a card!...Nancy :o)

    ReplyDelete

Post a Comment

We love comments! Please let us know what you think.

Popular posts from this blog

My Favorite Craft Tools and Giveaway!!!

Hi everyone, Today's video is a fun one for me. Since getting back into crafting I have noticed that I am pulling certain items over and over again and thought it would be fun to share with you. Two years ago, I took a step back from crafty and downsized 75% of my craft room.  However with just these awesome tools, I have been able to get back into the swing of things and I don't miss having a larger craft room. Personally, I feel every crafter should have these starting out.  They make creating easy and fun! Tools mentioned: Misti, Neehna Bright Cardstock, Distress Oxides, Ranger Dylusions die cut, In Love Art Shop word die cuts, ATG, Prismacolor Pencils, premade cards,Fiskars cutting blade and trimmer, Zig color pens, Wink Of Stella, Alcohol markers, t-ruler, Westcott 0 ruler, 6x6 paper pads, Versamark, EK Success powder tool, 3d Crystal Lacquer, Tombow adhesive, Momento/Hero Arts black ink, Cricut, Chameleon Black Pen, Pencil, Grid stamping block, etc. For the mont

MFP Stamp Shop June Blog Hop

Welcome to the MFP Stamp Shop June Blog Hop Let's get started!!!! This month's new Stamp Set Releases are: Featured  June 23 Paper Doll Chuck Featured  June 24   Paper Doll Chuck Formal and Hunting Featured  June 25  Background Diamonds and Flowers Featured  June 26 Pots and Vases 2 Please Hop along with us!! You have a chance to win one of these new stamp sets! Just comment on the following blogs ( don't forget this one ) each day for more chances to win! ( You do NOT need to comment on on all the blogs each day! The names are drawn randomly.) The winners will be announced on June 26, 2015 right here on the MFP Stamp Shop Blog. You can go back and comment if you missed a day. ( HINT: The more you comment the more chances you have to win. And comments on the MFP blog count twice. ) The deadline for commenting is Friday June 27, 2015 at 10:00 PM EST. Okay for this card, I went a different route. I thought with the holiday coming up, why not try to make Chuck's hunting ou

Fiskars AdvantEdge Punch System Review

Good morning friends, Carolyn here with a review of a new tool I just recently purchased.  Received a newsletter from Scrapbook.com recently and checked it out.  But I did not purchase from Scrapbook.com as it's out of stock, so went to another source, and it arrived this past Saturday afternoon. TIP:  Easy way to create borders for your scrapbook page layouts, or embellishing the page or creating edges for your cards.  Gives you ease of creating a border across the edge(s) of paper; and create a border strip and cut down to size you would like for embellishing a sentiment mat for a card or front of card. Supplies used: Fiskars AdvantEdge Punch System Fiskars' smaller interchangeable border punch cartridges - double scalloped edge   Fiskars AdvantEdge Punch System Here is a short write up about the system: The unique design of the AdvantEdge Punch System by Fiskars allows crafters to add perfectly aligned decorative borders and ribbons to any pr